Optimizing App Service Delivery Azure CDN
tags:
- App Service Plans
- App Service
- Azure
- Optimizing
Short-hand:
-
Azure CDN - Azure Content Delivery Network
-
AS - App Service
-
ASP - App Service Plan
Optimizing App Service using Azure CDN
In this short blog we will talk about optimizing the content delivery to an App Service using Azure Content Delivery Network. This will help us delivery updated versions of our code to Azure CDN to different regions around the world. Instead of delivering our code to a specific region in Azure we will distribute our code to multiple regions in Azure using Azure CDN. This allows users from all over the world to quickly access our App. We will also talk about creating a CDN profile/endpoints, configuring caching rules, Dynamic Site Acceleration and Azure CDN App Service auto-scaling.
Overview of Azure CDN
Azure CDN is a distributed network of servers all over the world. These servers store cached data for you content which minimizes latency to users all over the world. The Azure CDN offloads traffic from the source server which typically store static data such as HTML files, photos, videos, etc. Azure CDN can store dynamic data as well which is known as Dynamic Site Acceleration. We will talk more about dynamic site Acceleration later in this blog.
At a high level you have an origin server which is typically an Azure App Server, Web App, Blob storage, or Azure Media Services. This origin server stores you content which is then cached over to the Azure CDN server. When making updates to your origin, those updated files get cached to the Azure CDN server. The Azure CDN servers are also known as ‘Edge Servers’, these servers are spread out throughout the world. There is something know as ‘Point-of-presence (POP) locations which are located in Azure CDN regions. There are more POP locations then Azure data centers.
Here is an example of how data is received for a user using Azure CDN. The user (located in India) goes to our site ‘https://AwesomeSite.azureedge.net’ which is known as an endpoint. That endpoint points to an edge server that is located closest to the user’s location. That edge server then reaches out to the origin server point pull content and cache it on the specified edge server.

There is a setting called ‘Time to live’ that setting by default is set to 7 days. That setting refers to how long the cached data from the origin server will live on the edge server. If updates are made to the origin server then a purge of the cached data on the edge server will need to be done. You can purge all data on the edge server or you can purge a specific subset of data. Azure CDN is made up of profiles and endpoints. An endpoint is essentially a URL which points to an App Service, Web App, Blob storage, etc. By default, azure CDN endpoints are prefixed with ‘azureedge.net’. You can configure an endpoint to point to a custom domain name. A CDN Profile is a collection of endpoints and azure prices at the profile level. Azure CDN features are defined by which provider you choose and which pricing tier.
Link to Azure CDN Pricing Tiers: https://azure.microsoft.com/en-us/pricing/details/cdn/
Creating Azure CDN Profile and Endpoint
For this demo we will be using an existing Azure App Service to configure to an Azure CDN profile/endpoint. Navigate to your app service or content that you would like to configure to an Azure CDN profile/endpoint. On the left-hand side of the screen choose the ‘Networking’ tab then click on the ‘Configure Azure CDN for your app’ link. Here you will see an option to create and Azure endpoint. But wait, we need to create an Azure profile before creating an Azure endpoint since Profiles are a collection of endpoints. In the azure portal search for ‘CDN’ and select the ‘CDN’ button and click create. This opens a page to create a CDN profile which we need in order to tie our App Service endpoints to a CDN.
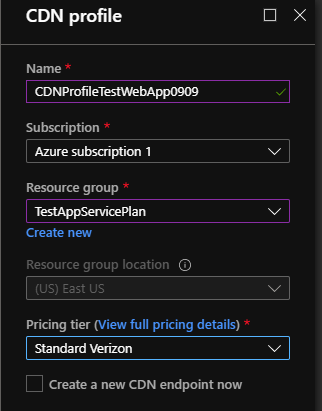
When creating a CDN profile you will need to create or use an existing resource group, specify a region to store the resource group and a pricing tier. In our case we will use the Version pricing tier so we can configure Dynamic Site Acceleration.
Once the CDN profile is created, let’s open it and add an endpoint to our App Service. Click on the plus sign on top of the screen to add an endpoint. Name your endpoint but keep in mind that it will be prefixed with ‘azureedge.net’ Next, we will choose our origin type, which in our case we are deploying a web app to the Azure CDN so we will choose the ‘Web App’ option. The Origin hostname is tied to the URL that we are currently using to access our Web App. This should auto-populate with the origin hostname tied to your existing web app. Since we are deploying the entire web app to the CDN we will leave the origin path blank so it uploads the root directory. The origin host header should be the same as the origin hostname. Next, we can define which ports to send the data over from the origin server to the Azure Edge servers. In our case we will keep the default port 80 for http traffic and 443 for https traffic. Lastly, we will choose the ‘General Web delivery’ option for the ‘Optimized for’ option.
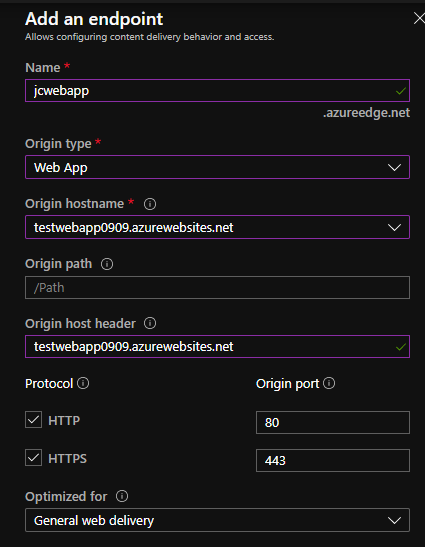
Now it I hit the endpoint URL ‘https://jcwebapp.azureedge.net/' it points to the web app source server!
Setting up Azure CDN Caching
If you open your content that you are uploading to the CDN which in our case is an Azure Web App and then navigate to the networking tab. Choose the ‘Configure Azure CDN for your app link’ which opens a new page. Click on the endpoint we just configured and then select the ‘Caching rules’ tab. By default, the caching settings are set to 7 days. Under ‘Caching behavior’ we have a few option listed below:
-
Not set - Inherits default caching settings
-
Bypass Cache - Ignores caching settings all together.
-
Override - Overrides the default caching settings.
-
Set if missing - Will inherit any caching setting set on origin server (Web App).
Let select the ‘Override’ option and then change the ‘Caching expiration duration’'Query string caching behavior’ settings what is listed below:

There is a few options for the ‘Query string caching behavior setting’ which are defined below:
-
Ignore query strings - This will request the first query string from the origin server to the edge server but will ignore any other requests that come throw with the same query string.
-
Bypass caching for query strings - This will request the query string from the origin server to the edge server each time a request comes in. This will ignore caching all together.
-
Caching every unique URL - When a unique query string that is requested from the user will be cached from the origin server to the edge server.
Under custom caching settings we can setup specific caching rules for specific file paths or file extensions. I am going to specify a specific path that I want to ignore caching on. This will allow the user to pull the most recent files from a specific path on my Web App each time a request comes through. Essentially, this is sending a request directly to the origin server each time when a specific path is called.
Let save the settings but keep in mind some of these settings will not propagate for 90 minutes. This is the issue when testing these setting because it will take time for those settings to be updated.
Purging Cache
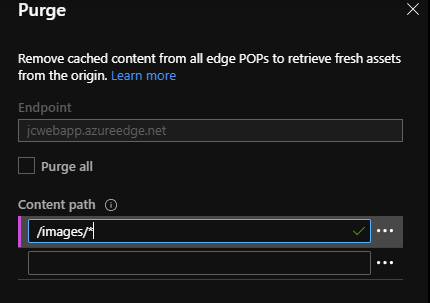
Navigate to the Azure CDN setting for your content that you are sharing. On the top of the screen click on the purge button. Here we can purge the data stored on the edge server. In our case we updated an image and uploaded it to the origin server but the edge server still has the old image cached. We will choose the predefined endpoint pointing to our origin server and clear the images path.
There is a maximum 50 limit request for each purge. The purge usually takes around 2-3 minutes but that is dependent on how much content we are purging on the edge server. We have been talking mainly about static data but in this next section we will talk about dynamic data with Dynamic Site Acceleration but will not configure it in Azure.
Dynamic Site Acceleration
Dynamic data in response to user’s requests or behavior. This allows the users request to change the data that is being retrieved from the origin server on demand. Dynamic Site Acceleration is only offered on specific pricing tiers listed below:
-
Version Standard
-
Version Premium
-
Akamai
Dynamic Site Acceleration has two approaches.
-
Rout Optimization - This finds the fastest route from the edge servers to the origin servers. This compares routes from POP locations and finds the most optimized route to retrieve data to the end user.
-
TCP Optimization - This is an algorithm that prevents network congestion. This limits the data sent over internet until packets are lost.
To configure Dynamic Site Acceleration, we will need to upload a probe file. Caching is turned off by default for Dynamic Site Acceleration, however, we can turn it on for specific file paths.
We have talked how Azure CDN works and how to create profiles that store endpoints to point to content origin servers. For the last blog in this series we will talk about how to monitor and diagnose issue with App Service plans in Azure.
Until next time! Cheers!
Jared Clark