Docker 101
Intro
In this tutorial I will be talking about Docker and how to leverage docker in your environment. We will talk about how to install docker on your local machine, using docker, building containers with docker, docker architecture, and orchestration of docker containers. So let’s get started by talking about ‘What is Docker’.
What is Docker?
Docker is an open platform for developing, shipping, and running applications. Docker enables you to separate your applications from your infrastructure so you can deliver software quickly. With Docker, you can manage your infrastructure in the same ways you manage your applications.
Developers can create containers without Docker, but the platform makes it easier, simpler, and safer to build, deploy and manage containers. Docker is essentially a toolkit that enables developers to build, deploy, run, update, and stop containers using simple commands and work-saving automation through a single API.
Docker is an open source containerization platform. It enables developers to package applications into containers—standardized executable components combining application source code with the operating system (OS) libraries and dependencies required to run that code in any environment
Docker carves up a computer into sealed containers that run your code and gets your code to and from your computer. Docker is responsible for building these container and running code inside these container in an isolated controlled environment. There is a docker network where you can share and utilize other users predefined containers. Docker Is NOT a VM but an abstraction of a VM. This means you can have multiple containers running on a single VM all doing a specific job for your application to run.
What is a container?
A container is a self-contained unit of software where it has everything it needs to run the code. A container includes code, configs, processes, networking , all of its dependencies and the operating system.
For example, you could have a container running that has a database instance running with all of its storage and a virtual network attached to that container which can talk to another container running your Web Server. Docker is responsible for building, deploying and tearing down this containerized environment.
Some things you should know before continuing with this tutorial would include the following:
- Basic command-line environment experience
- Basic networking knowledge
- PowerShell, Bash, and/or shell scripting
How to install Docker?
To get the MSI or EXE to install docker on your local system then click on the link below:
- Docker install - https://docs.docker.com/get-docker/
In this tutorial we will be installing docker for windows but feel free to download the installer for your system. Once downloaded then you can open the download which will start the download process to your local system. If you are installing docker on windows then it will require that Hyper-V is enabled for the base VM image for the containers to be provisioned from. It will prompt your to enable Hyper-V on your local Windows machine. Please note, once the docker installation is completed it will prompt you to restart your local system. This is required because docker will be updating the Kernel on your local system to run containers.
After your computer restarts, open a command line interface and run the following command to download the default docker image.
- Command: docker run hello-world
Now you have downloaded the default docker image for the hello-would container to run on your local system.
Using Docker?
Now that docker is installed on your local system we will talk about docker commands and how to start using docker. Let’s take a minute and talk about docker flow. The docker flow all starts with an image which makes up just about every file that is needs for a container to operate. The command below allows you to look at all the docker images downloaded to your local system:
- Command: docker images

As you can see there is some information displayed about the images downloaded to my local machine. Here you see a few column which are defined below:
- Repository – Name of the image
- Tag – Version of the image
- Image ID – Unique ID for that version of the image
- Created – Date of created image
- Size – The size of the image
Tip: to remove and image you can run the following command:
- Command: docker rmi [image_id]
Now that we have an image we can create a container off of that image that will be a living running isolated environment for our code to run.

Docker run
To create a container off the any image download you can run the following command:
- Command: docker run –ti ubuntu:latest bash
Tip: –ti – Terminal interactive, which means you can navigate through the container when it is running.

To exit the container bash terminal, simple type ‘exit’ or ‘CTRL + D’. This will allow you to exit the terminal of the running container. If you do not include the ‘-ti’ parameter into the docker run command there would be no output in the terminal.

View Docker Containers
If you want to view all the running containers you can use the command below:
- Command: docker container ls –a

Tip – The parameter ‘-a’ list all running containers.
Let’s quickly talk about the information displayed from the output above. The ‘Container ID’ is a unique ID assigned to the container during the container provisioning process. Please note, this is not the same ID as the ‘Image ID’.
- Image – Image that the container is provisioned from
- Command – Command type
- Create – Time the container was created.
- Status – Last know status from container
- Name – Unique name for provisioned container
To stop a running container you can run the following command:
- Command: docker stop [container_name]
When creating container you might run into an instance where you make a change to the container that you want to keep for all newly created containers. Docker has a feature known as ‘Docker commit’ which allows you to create an image off the modified container. Please note, this does not affect the original image the container is provisioned from but creates an entirely new image from the updated container.
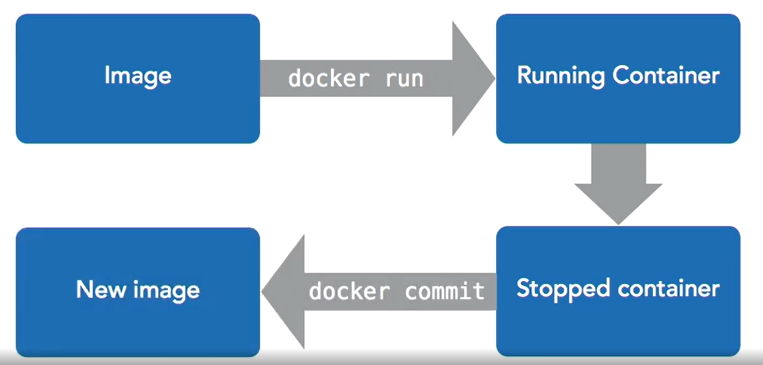
Docker Commit
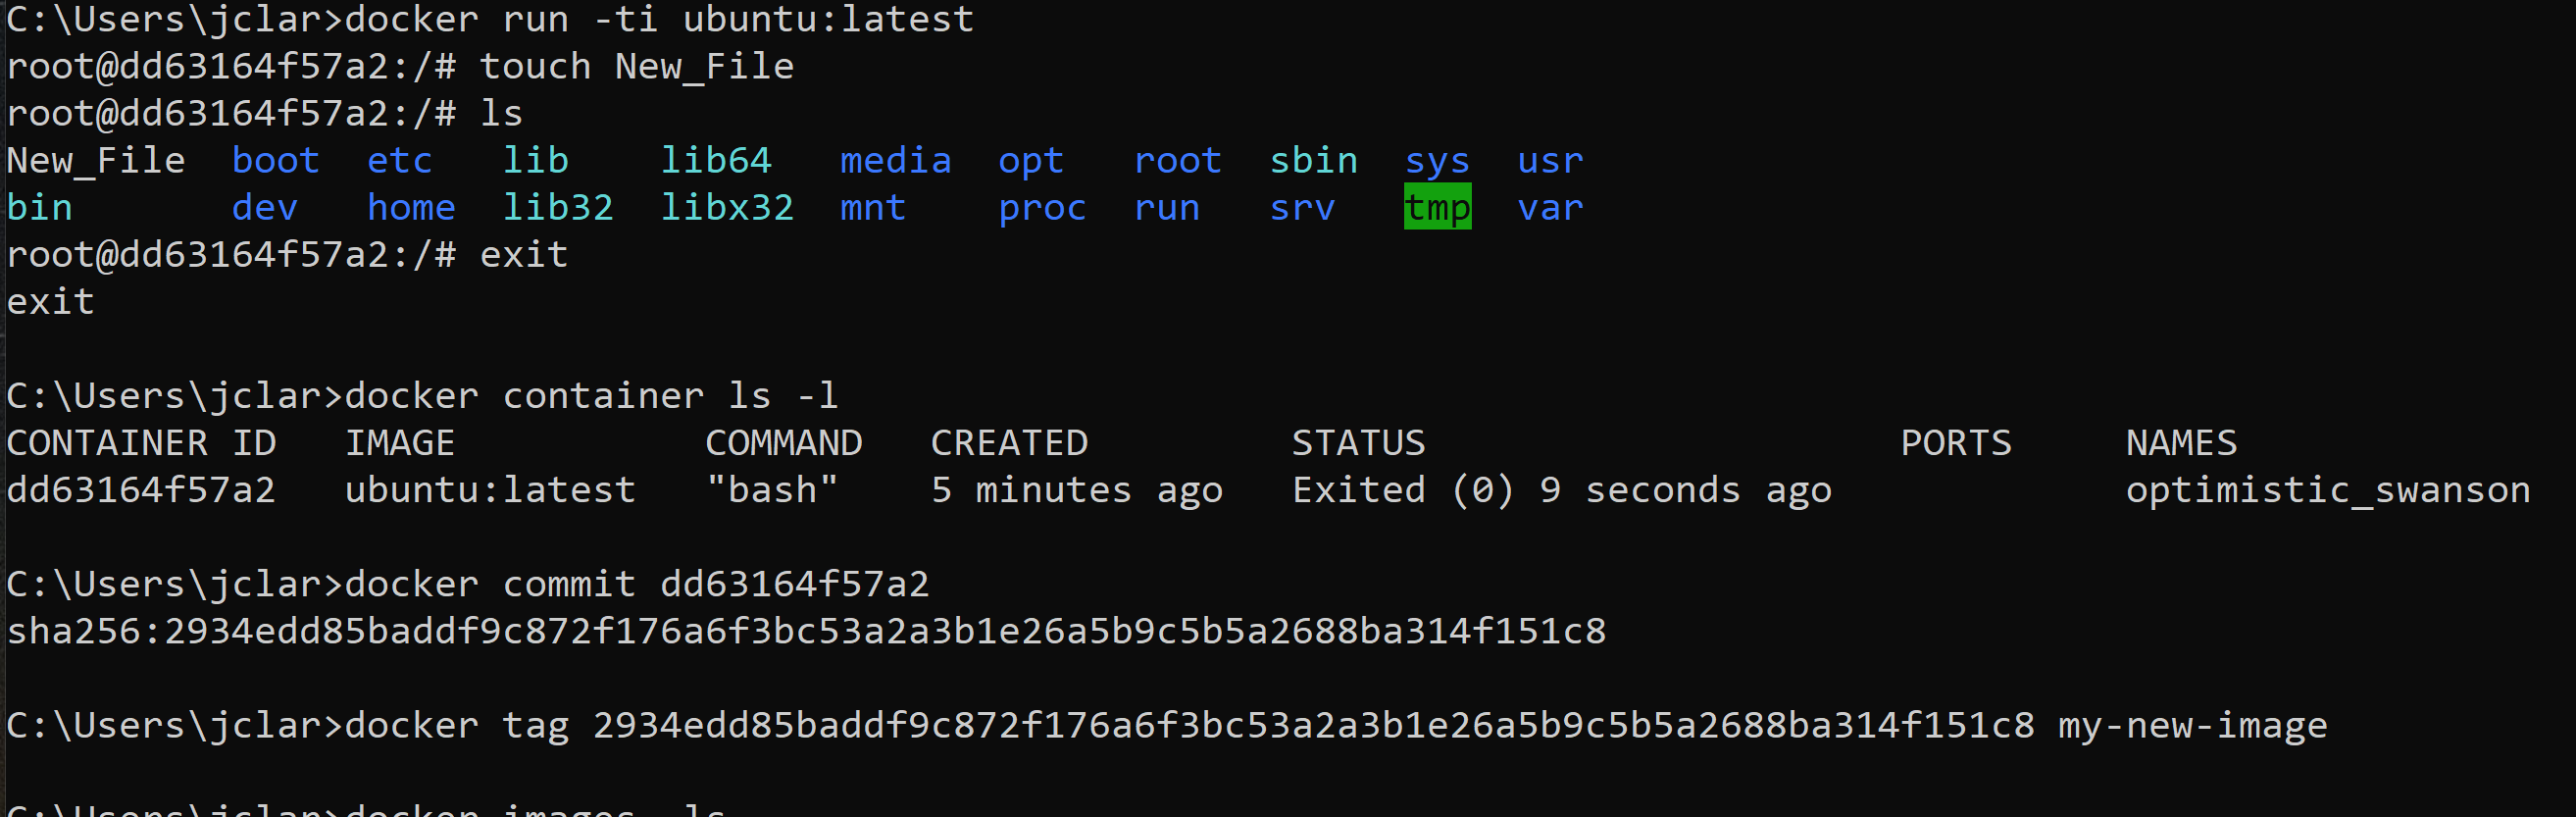
To create an image from an updated container then follow the steps below: Create a container from the base image:
- Command: docker run –ti ubuntu:latest bash Modify the container(create a new file):
- Command: touch New-File Exit the container:
- Command: exit List the latest container(grab the ‘container id’):
- Command: docker container ls –l
Create a new image off container: - Command: docker commit [container_id] This will output a long string but what you want to grab is the string(image id) after the semi-colon and create a tag for your newly create image.
- Command: docker tag [image_id] [tag_name]
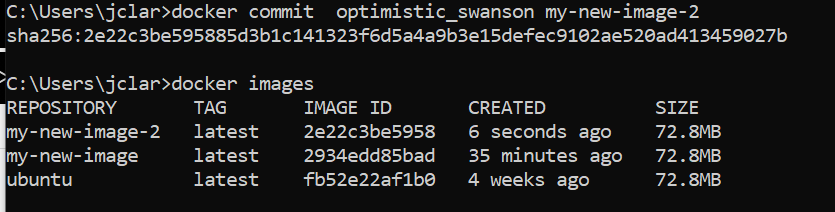
To list the new container with the tag then run the following command:
- Command: docker images

Now we have a newly created images with the changes we made in the container that we can use to provision new containers. To create a new container off the images we just created then you can run the following command:
- Command: docker run –ti my-new-image bash

You can skip the tag creation process for the newly created image by running the following command in your docker commit:
- Command: docker commit [container_name] [tag]
Docker Attach/Detach
Let’s take some time and talk about the most important concept in docker which is running things in docker. The docker run command provisions a container off an image which contains a main process and when the container stops the process stops. One thing to note here would be docker containers have one main process and when that process completes the container de-provisions. Up until this point we have been running containers in an interactive session and exiting the container. If we want to run a container and run a process then remove the container we can run the following command as an example:
- Command: docker run –rm –ti ubuntu sleep 5
Tip: The –rm parameter is a commonly used parameter to de-provision the container once the container finishes running its main process. This is used for easy clean-up when provisioning containers. Additionally, you can notice I have didn’t include the ‘latest’ tag in my command so docker understands if no tags are included for the image it will grab the latest.
When running the command above it will provision a container from the ubuntu image and pass in the ‘sleep 5’ bash command which will sleep the container for 5 seconds and once that process is completed it will de-provision the container. We can pass in multiple commands into the container by running the following command:
- Command: docker run –ti ubuntu bash –c “sleep 3; echo all done”
Tip: By adding the ‘-c’ parameter into the docker command we can pass in commands we want to run on the container for its main process. Additionally, you can pass in commands by separating them with a semi-colon. So the command listed above will provision a container and run a bash command to sleep the console for 3 seconds then echo ‘all done’. Once finished running the commands it will de-provision the container.

Let’s talk about leaving things run in a container. If we want to provision a container and have it keep running in the background we could run the following command:
- Command: docker run –d –ti ubuntu bash
Tip: The parameter ‘-d’ allows the container to run in detached mode which means the container will run in the background until the main process is completed or is de-provisioned. Since we passed in the ‘bash’ command that means this container will run forever until it is de-provisioned. If we get the name of the container we can run a docker command to attach to the container to run another process or exit the terminal.
Get the container name of the last run container:
- Command: docker container ls –l Attach to the container:
- Command: docker attach [container_name]

Now what happens if you want to run more things in an already provisioned container. For example, we create a container and pass in the ‘bash’ command to open a session to the command –line then we want to add a process to that container from troubleshooting purposes we could leverage the ‘docker exec’ command. This command is used to add/start another process to the running container. Please note, you cannot use this command for adding port, volumes, networking, etc. To run the docker exec command to an already running container you can run the following commands:
- Command: docker exec [container_name] bash

This will allow us to open a bash session to an already running container for troubleshooting purposes. Sometimes we want to look at the logs for a container that is having trouble running its main process and in that case we can use the ‘docker logs’ command. To set this up we will run a docker run command and pass in an invalid Bash command. This will run in the background and fail which in turn we will run the docker logs command to see what caused the issue.
- Broken command: docker run –name example –d ubuntu bash –c “lose /etc/password”
- Logs command: docker logs example

Stop/Delete Containers
In order to stop and remove a running container you first need to stop the running container and then delete the container. Simply stopping the container will not automatically delete the container.
- Stop container: docker kill [container_name]
- Delete container: docker rm [container_name] Tip: To stop and delete all running container then you can run the following commands:
- Stop all containers: docker kill $(docker ps –q)
- Delete all containers: docker rm $(docker ps –a –q)
When running a docker container you have the ability to allocate specific resources to a single container. If we want to allocate a specific amount of memory to a container we can run the following command:
- Command: docker run –memory [max_memory] [image_name] [command] Tip: To allocate CPU limits to a container you can run the following command:
- Command: docker run –cpu-shares – Containers running will share the CPU resources
- Command: docker run –cpu-quota – Limits the CPU resources allocated to containers
Exposing Ports
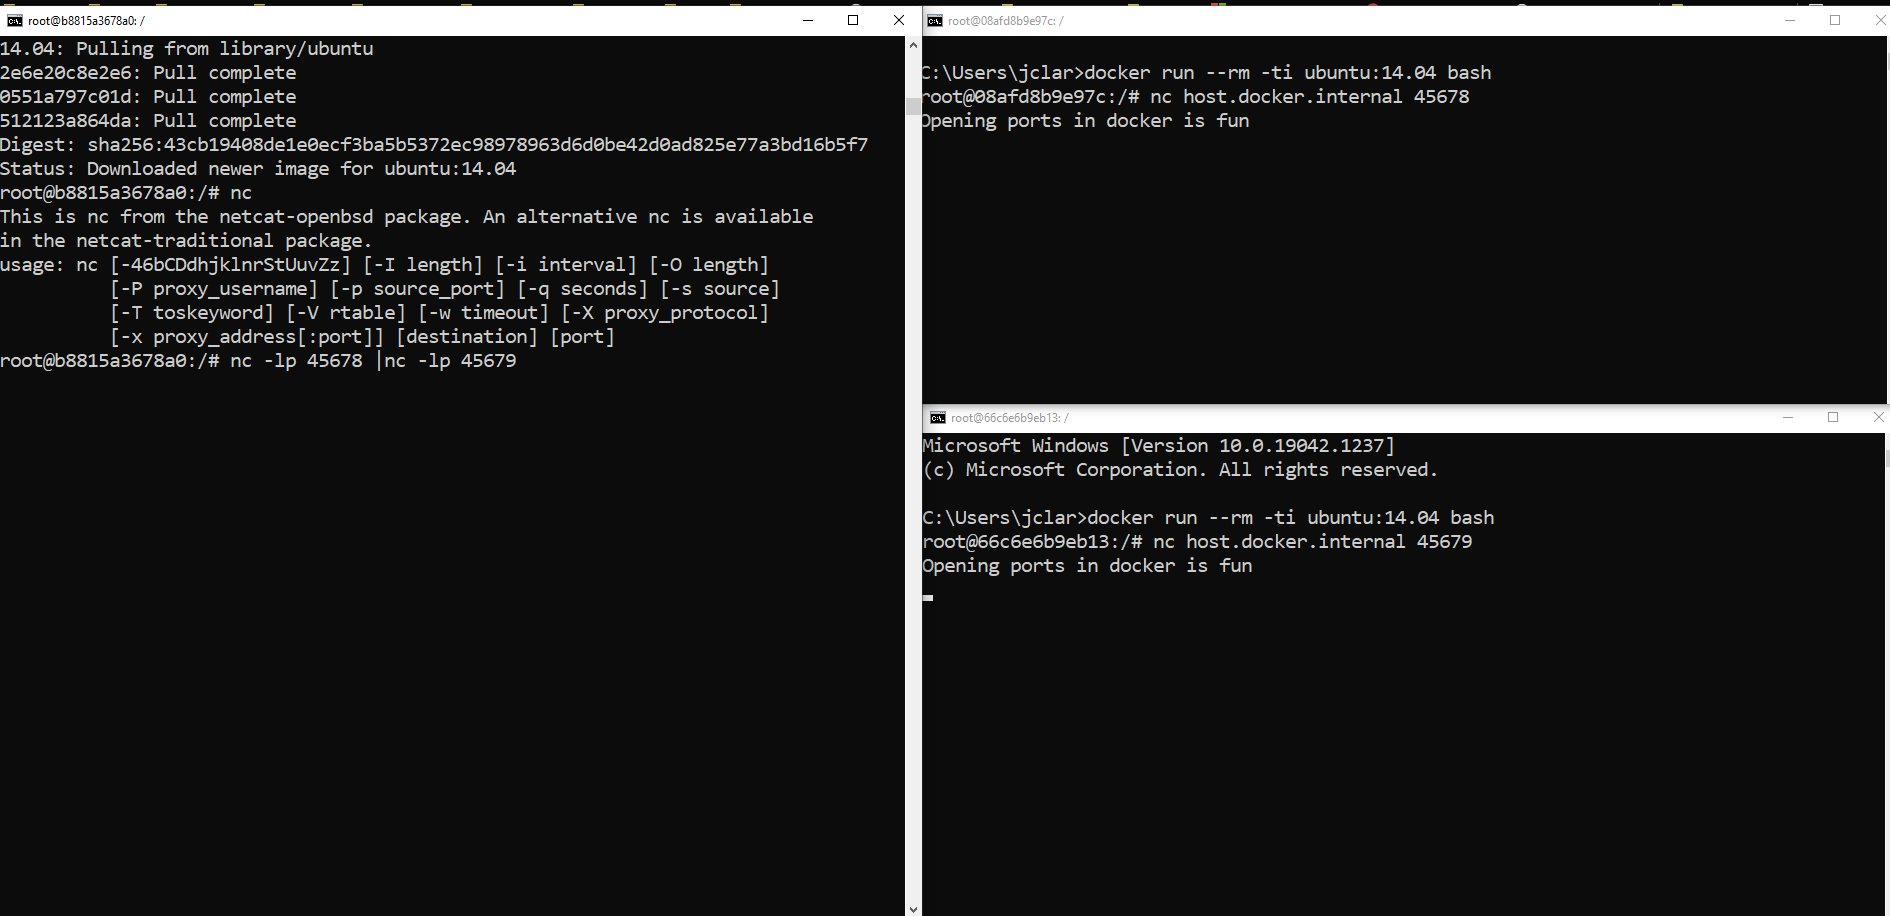
By default when provisioning a container it is isolated from the internet which means it is part of your local private network. You can explicitly expose a container to the internet by opening ports on your container to allow traffic in and out of your container. Exposing ports in your container allows your container running on a private network to talk to things outside your private network. When exposing a port you need to explicitly specify the port inside the container and outside. You can expose any amount of ports and coordination between containers is required it you want containers to talk to one another. Below is an example with two running containers with ports exposed to one another and a third container to watch the traffic:
- Container one command: docker run –-rm –ti –p 45678:45678 –p 45679:45679–-name container-one ubuntu bash
Tip: The –p docker command stand for ‘Publish’ which defines which ports you want to open. As you can see there are two ports defined separated by a colon. The first port is the ingress port and the second port is the egress port.
Once inside the container we can run a net cat program to see if the port is open and what traffic flow in and out of the container:
- Container one command: nc –lp 45678 | nc –lp 45679
Open a second terminal window and create the second container that will talk to the first container.
- Container two command: docker run –-rm –ti ubuntu:14.04 bash
- Container two command: nc host.docker.internal 45678
Open a third command window and provision a third container to watch the traffic:
- Container two command: docker run –-rm –ti ubuntu:14.04 bash
- Container two command: nc host.docker.internal 45679
Back in the second container type whatever you would like and watch the text from one container into another.
You can dynamically open external ports to the container by not specifying the second port. For example, you can run the following docker command which is open the internal port 45678 and dynamically open the external port which docker will define.
- Command: docker run –-rm –ti –p 45678 –-name container-one ubuntu bash
To define a specific protocol for the traffic coming through the ports you can run the following command:
- Command: docker run –p [outside-port:inside-port]/[tcp/udp]
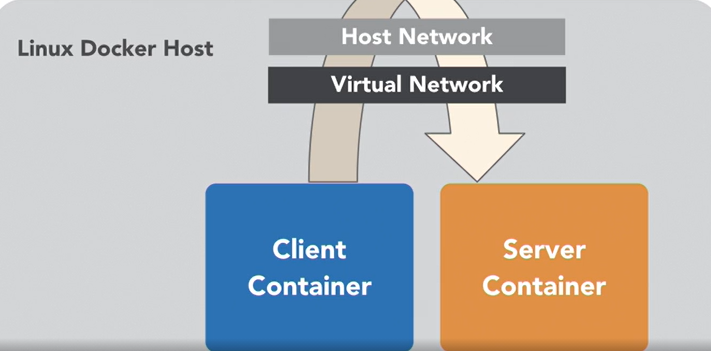
Docker Networking
When exposing a port in Docker it creates a path from the container to the host network. Other containers can connect to that container by going out of its container into the host network and back into the container it is talking with.
Docker comes with some networks by default. To look at the default networks you can run the following commands:
- Command: docker network ls
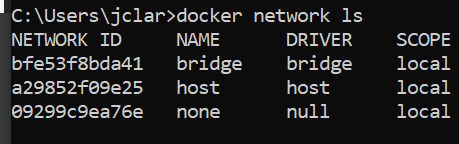
Types of networks described below:
- Bridge Network – Defines the default network the containers are deployed.
- Host Network – Host machine network and when you do not want the container to have an isolation at all. This poses security threats and should not be used except for testing.
- None – Defines if the container should have no networking at all.
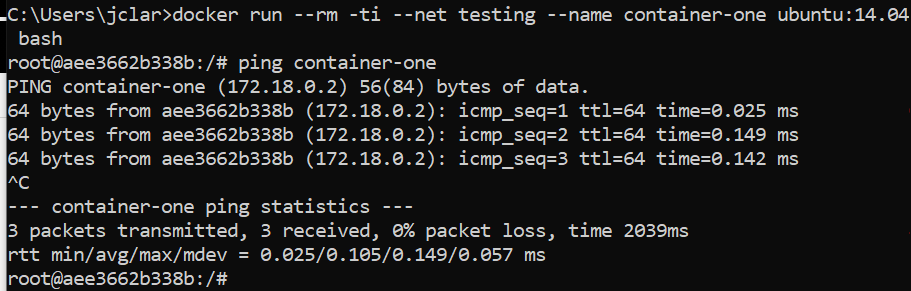
Now let’s create a ‘testing’ virtual network in docker. To create a virtual network run the commands below:
- Command: docker network create testing
Once the network is created we can add a container to the at virtual network by running the following command:
- Command: docker run –rm –ti –net testing –name container-one ubuntu:14.04 bash
To test the container network you can ping the name of the container name from inside the bash terminal by running the following command:
- Command: ping container-one
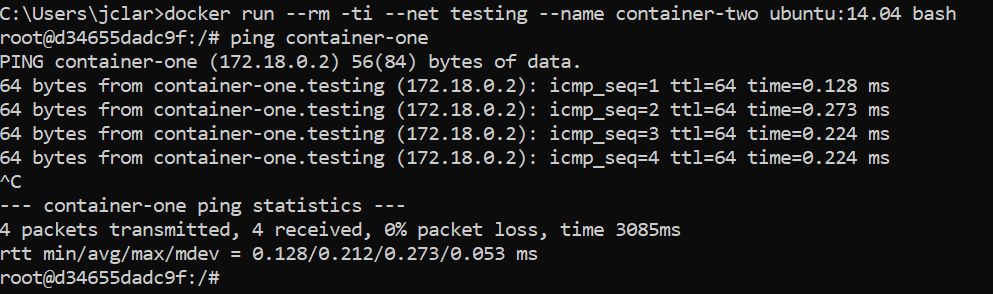
If you want to start second container in the same network and ping container one from the second container you can run the following commands:
- Command: docker run –rm –ti –net testing –name container-two ubuntu:14.04 bash
- Command: ping container-one
Tip: To connect a running container to another network you could create a second network called ‘network-1’ and run the following command to add it to both ‘testing’ and ‘network-1’ networks.
- Command: docker network connect network-1 container-one
Docker Volumes
Let’s talk about sharing data across containers. Docker using ‘volumes’ as a shared folder that can be used across various containers. With volumes you can share data between containers running in docker and share data between the host and the containers. There are two types of volumes in docker which are defined below:
- Persistent – The volume on the host machine will stay consistent when containers are using said volume
- Ephemeral – These volumes exist only when the container is using them. When the container stops the volume is deleted.
Let’s share a folder from our local machine(host) to a container. First, create a folder on your local machine.
- Command: mkdir example
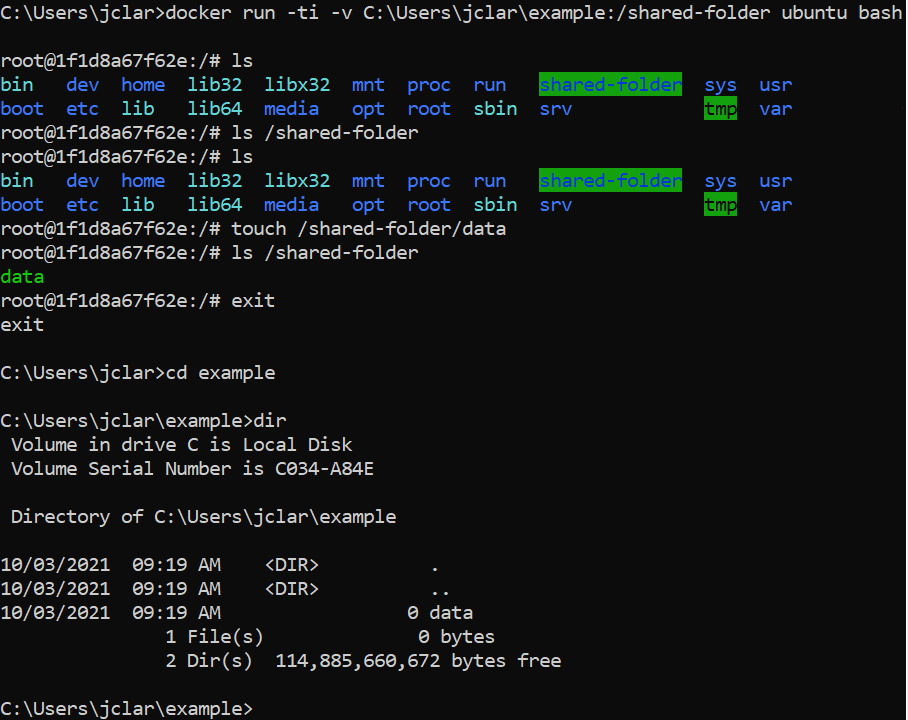
Once the folder is created on the host machine you can run the following command to create a container with the volume attached:
- Command: docker run –ti –v C:\Users\jclar\example:/shared-folder ubuntu bash
Create a ‘data’ folder inside the shared-folder in the container:
- Command: touch /shared-folder/data
Exit the container and navigate to the ‘example’ folder on your local machine to see the persistent data flow from the container to the host machine.
Tip: If you want to share a single file from the host machine to the container you need to explicitly list the files entire path. Additionally, you will need to make sure the file exists on the host machine because if the file does not exist it will create a folder with the file name on the container.
Now let’s create a shared volume between two containers. This volume is Ephemeral and will only exist when the containers are running.
- Command: docker run –ti –v /shared-data ubuntu bash
Tip: The –v parameter used in this case will create a shared folder on the container NOT on the host.
Put some data in the share-data folder by running the following command on the container:
- Command: echo hello-world > /shared-data/data-file Now let’s start up another container.
- Command: docker run –ti –volumes-from [container_name] ubuntu bash
If you navigate to that file on the second container you will see the data. You can update the data-file and it will get updated on the first container. When both container stops it will get removed from both containers but if one container stops even if it’s the first container the shared folder will still exist on the second container. Only when all containers using that shared folder stop then the shared volume will get deleted.
Now we are just scratching the surface of what docker can do and it upcoming blogs we will take a deeper dive into what docker. I hope you enjoyed reading this blog and I will see you in the next one.